![]()
![]()
Frequently Asked Questions / Help
Group Set-up
How to Import from a .txt File
- Create a .txt file using “Notes” on your iPad in the following format:
- First Name, Last Name, Gender, Email
- Gender: M, F, NB
- Example: Billie, Wilson, NB, wilsonb@gmails.com
- Download a template <HERE> and open in Word, or on Notes in the iPad
2. Once you’ve created the Notes list, select ![]() and “Send a Copy”
and “Send a Copy” ![]()
3. Selected “Save to Files” and save “On My iPad” or “iCloud Drive”
4. In the Equity Maps layout screen, select “Import Participants from txt File”

5. When you see the import instructions, select “OK” and select the Folder and File from step 3.
6. You’re ready to map!
 0
0
 3
3
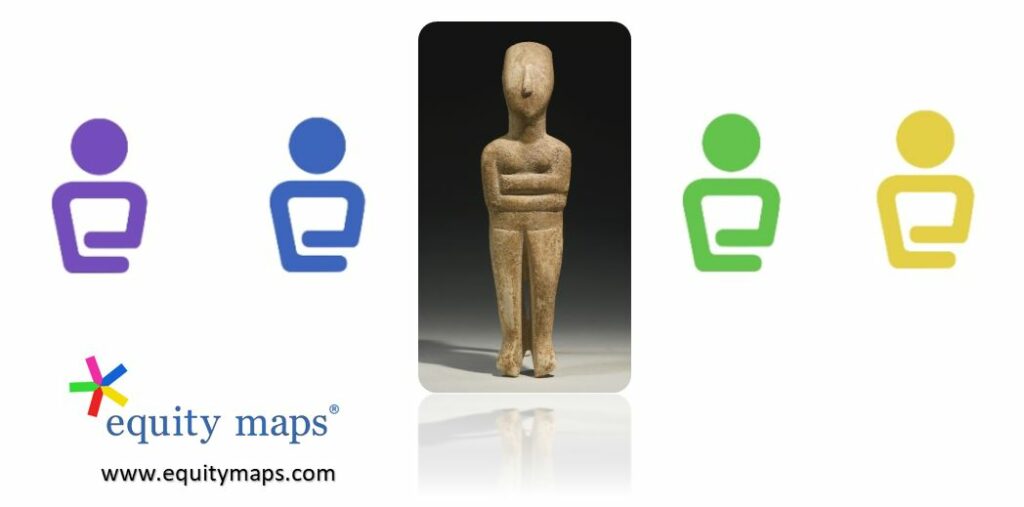
Yes. Participants can choose female, male, or non-binary. Additionally, users can choose from among the following roles: student, participant, facilitator, presenter, or teacher.
The non-binary icon was designed from the home of Socrates in Athens, Greece and based on ancient Cycladic figurines dating from ca 2500 BC. Our icon was inspired by a Greek artist who once told me when I ask about one of her designs based on the same Cycladic statue, “It’s human, neither male nor female, simply human.” – Dave Nelson, Founder of Equity Maps is an avid traveler, teacher, and historian who finds design and thought inspirations in cultures from all around the world.
 2
1
2
1
![]()
Create Class Lists that you can easily import for any lesson, meeting or group activity:
Part I- Create your class list:
- Go to the main menu of Equity Maps and tap “Create a New Map”.
- Create a name for the class (for example ‘Block 4 History’) and enter all of the students by gender.
Part II- Import at anytime from your Class List:
- Each time you hold a Socratic Seminar, discussion, class, or group activity, go to main menu and tap “Create a New Map”;
- Create a Name for that day’s activity and select the room layout, or the Yellow Class for open seating; Tap Done.
- Select, “Import from an Existing Group”;
- Select the class name to import- (for example ‘Block 4 History)
- Slide the day’s participants into place from the class icons at the bottom;
- Long-tap on students to adjust some of the icon colors according to their clothes, to make the mapping even easier;
- Tap Done and You’re ready to map the group!
By setting up the participants ahead of time, you can easily create groups or map specific lessons.
2
0
 Delete or Temporarily Remove Participants
1) Delete Participants:
- Go to the Layout Screen and long tap on any icon
- Tap the garbage can at the bottom of the pop-up to delete the participant
- *Note: You can delete a participant at any time before or even during the mapping
![]()
2) Remove Participants from a mapping session, meeting, or lesson:
- To remove a participant from the mapping screen without deleting him/her from the overall group, simply pull the icon to the bottom of the layout screen.
- When in the mapping screen (even when your class or meeting is recording) return to the layout screen by tapping the “Settings” button in the top right corner of the mapping screen:

- Select “Edit Group Layout”
- To remove a participant simply slide the icon to the bottom tray.
- You can also move any of the icons or add additional participants, even while the meeting is still be recorded and the visual mapping will adjust accordingly.
- Once complete, tap “Done” and you will return to the mapping screen.
![]()
2
0
Create Group Lists that you can easily import for any lesson, meeting or activity:
It is super easy to import from an existing group that you’ve created! The current version of Equity Maps does not have the ability to import the participants from an external file, although this feature will appear in future versions.
Part I- Create your class list:
- Go to the main menu of Equity Maps and tap “Create a New Map”.
- Create a name for the class (for example ‘Block 4 History’) and enter all of the students.
Part II- Import at anytime from your Class List:
- Each time you hold a Socratic Seminar, discussion, class, or group activity, go to main menu and tap “Create a New Map”;
- Create a Name for that day’s activity and select the room layout, or the Yellow Class for open seating or Red for adjustable seating; Tap Done.
- Select, “Import from an Existing Group”;
- Select the class name to import- (for example ‘Block 4 History)
- Slide the day’s participants into place from the class icons at the bottom;
- Long-tap on students to adjust some of the icon colors according to their clothes, to make the mapping even easier;
- Tap Done and You’re ready to map the group!
By setting up the participants ahead of time, you can easily create groups or map specific lessons.
1
1
Standard Version – You can add up to 20 participants to your classroom or meeting.
Premium Version- Add up to 40 participants to your classroom or meeting.
Remember that as you add more students or participants, you can shrink the size of the icon![]() s according to the make-up and arrangement of your group. Simply use the zoom control in the layout screen to shrink or enlarge the icons:
s according to the make-up and arrangement of your group. Simply use the zoom control in the layout screen to shrink or enlarge the icons:

1
1
Deleting Group or Session
Delete or Temporarily Remove Participants
1) Delete Participants:
- Go to the Layout Screen and long tap on any icon
- Tap the garbage can at the bottom of the pop-up to delete the participant
- *Note: You can delete a participant at any time before or even during the mapping
![]()
2) Remove Participants from a mapping session, meeting, or lesson:
- To remove a participant from the mapping screen without deleting him/her from the overall group, simply pull the icon to the bottom of the layout screen.
- When in the mapping screen (even when your class or meeting is recording) return to the layout screen by tapping the “Settings” button in the top right corner of the mapping screen:
- Select “Edit Group Layout”
- To remove a participant simply slide the icon to the bottom tray.
- You can also move any of the icons or add additional participants, even while the meeting is still be recorded and the visual mapping will adjust accordingly.
- Once complete, tap “Done” and you will return to the mapping screen.
![]()
2
0
Delete a session or group:
- To delete a group, tap “Map Existing Group”
- To delete a session, tap “Feedback Frames”
- Slide “left” the group or session that you want to delete.
- Tap “Delete”
2
0
Delete a group or session:
- To delete a group, tap “Map Existing Group”
- To delete a session, tap “Feedback Frames”
- Slide “left” the group or session that you want to delete.
- Tap “Delete”
2
0
Mapping Screen
NO! Equity Maps is a native, stand-alone app, so no need for additional accounts. This also helps to keep your data safe because it only exists on the user’s device.
1
0
Delete or Temporarily Remove Participants
1) Delete Participants:
- Go to the Layout Screen and long tap on any icon
- Tap the garbage can at the bottom of the pop-up to delete the participant
- *Note: You can delete a participant at any time before or even during the mapping
![]()
2) Remove Participants from a mapping session, meeting, or lesson:
- To remove a participant from the mapping screen without deleting him/her from the overall group, simply pull the icon to the bottom of the layout screen.
- When in the mapping screen (even when your class or meeting is recording) return to the layout screen by tapping the “Settings” button in the top right corner of the mapping screen:
- Select “Edit Group Layout”
- To remove a participant simply slide the icon to the bottom tray.
- You can also move any of the icons or add additional participants, even while the meeting is still be recorded and the visual mapping will adjust accordingly.
- Once complete, tap “Done” and you will return to the mapping screen.
![]()
2
0
Audio Recording during the class or meeting:
The Microphone is set to default “Off” position. In order to record your meeting you must press the microphone icon on the top of the mapping screen:

Once pressed, the mic will be enabled and look like this:
![]()
Once the mic is enabled it will record audio of each participant as you tap on the corresponding icon. If you’ve got a larger group it is also effective to use an external USB microphone with an extension cable so that the mic can be placed in the center of the group. Note that not all USB Microphones work with the iPad and you will need the Apple USB Camera Adapter. Here’s a link to a helpful explanation of how you can hook up a USB Microphone to your iPad.
0
0
Tracking Class / Meeting Actions:
At the top of the mapping screen you will find the five meeting / class actions that you can track. These are often used by facilitators, instructional coaches, administrators or teachers to track the overall flow of the class or meeting.
Each time you select one of these buttons, Equity Maps will track the time of that event, and if the microphone is on, it will also record the audio of that event.
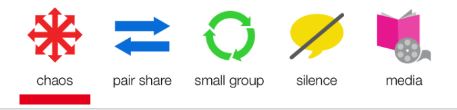
Tap on the icon that indicates the group’s actions at the time:

Chaos: When more than one person is talking at once.
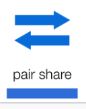
Pair Share: When students/participants are paired to share information.
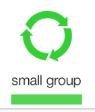
Small Group: When students/participants are grouped for limited periods of time before coming back together in a large group.

Silence: When the group is silent, no one is speaking or the teacher/facilitator is waiting.

Media: When the group is reading, watching, or listening to a piece of media during the class or meeting. Media is selected when the group is watching a video clip, listening to a clip or reading an extract.
1
1
Add participants or move participants around in the seating chart, even after you’ve started the session.
Two ways to edit participants once you’ve started the meeting:
A) Pause the Class / Meeting while mapping and edit the layout
1. In the Mapping Screen, tap Pause![]() (This will pause all recording of voice and time).
(This will pause all recording of voice and time).
2. In the same Mapping Screen, tap “Edit layout: ![]()
3. While in the layout screen, you can move the icons, change colors, edit titles, or add new participants.
4. Once complete, tap “Done” to return to the mapping screen: ![]()
5. Press “Resume” to continue mapping your meeting: ![]()
B) Continue Recording the Class / Meeting while you edit the layout or add a participant
1. In the same Mapping Screen, tap “Edit layout: ![]()
Note that Equity Maps will continue to record the audio and will continue to count time for the speaker who was last speaking at the time you selected “Edit Layout”
2. While in the layout screen, you can move the icons, change colors, edit titles, or add new participants.
3. Once complete, tap “Done” to return to the mapping screen: 
4. You will be returned to the mapping screen, where you can tap on the next speaker or group action.
0
0
Feedback Frames -Reviewing your class/ meeting
Export Data in CSV File and Map Image
Now available in the Premium version of Equity Maps is the ability to export a CSV File that contains the data from the Feedback frames. The CSV file can be opened in Numbers or Excel, making it easier to track over time.
To access the export function, make sure that you’ve downloaded the Premium in-app purchase or the Premium App.
- Go to the feedback frames
- Tap the export icon in the top right corner
2
4
Display the Feedback Frames during your debrief to share with your group:
The easiest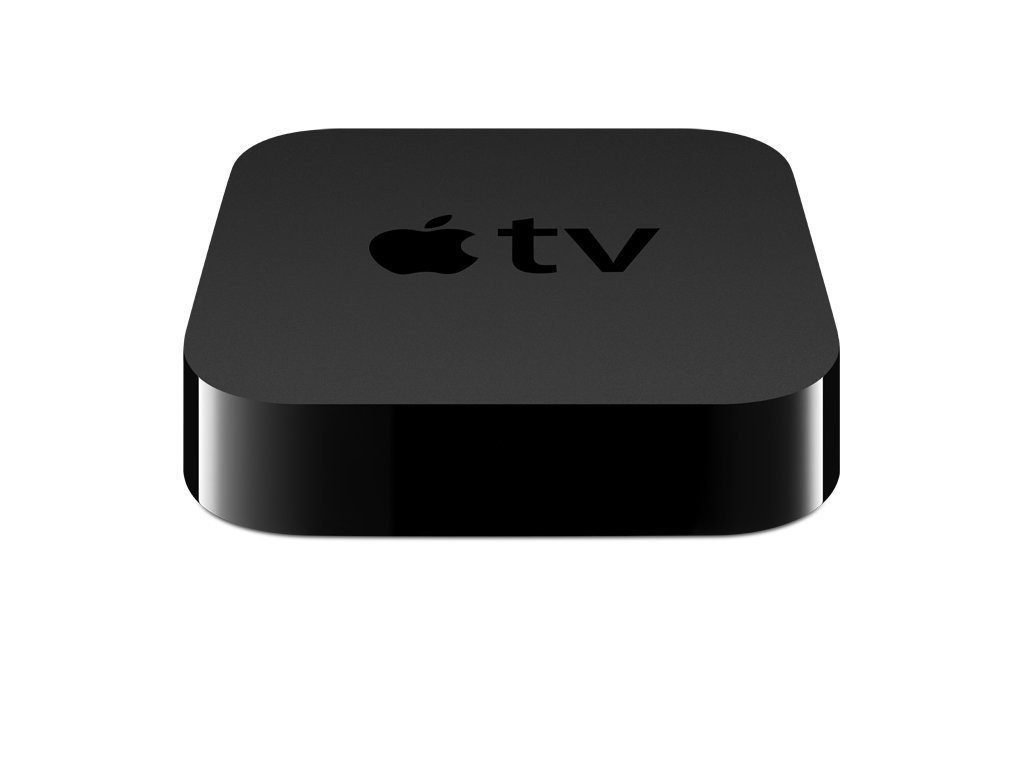 way to present the data to the participants is through the AirPlay Mirroring function built into your iPad through an Apple TV.
If you don’t have an access to an Apple TV, we’ve also had very good luck with X-Mirage, an inexpensive mirroring software that lets you mirror and project directly to Windows in HD with sound. This is a option as well!
2
2
CheckNotes
![]()
*Available in the Premium Version
Edit a CheckNote Template or Create your own CheckNote Template:
- From the main menu tap “Create a New Map” or “Map Existing Group”.
- Select the existing group, or if this is your first group, add a group name, choose a layout, and tap “Continue”. (Hint, the yellow classroom layout will allow you to freely place participants anywhere on the screen.)
- Tap “Done” to enter the mapping screen.
- BEFORE you begin mapping, tap the blue settings icon in the upper right corner

- Tap “CheckNote Template” and the list will appear.
- Tap “View/Edit” view or edit your desired template.
- You can tap on any characteristic to edit the description, you can swipe left to delete a characteristic, or you “Add a Category” to add a new characteristic.
- To create your own template, tap “My Template”, which will be blank upon download of the app.
- Tap “Add Category” to add a characteristic.
- Swipe any category left to delete the category from the template.
- We recommend using an Apple symbol or emoji for each Characteristic for quick and easy reference while mapping.


- Once complete tap “Back” and you will be prompted with the following:
- “Would you like this as your default CheckNote template? YES/NO”
- Tap “Yes” and that CheckNote template will be included with all future groups until you edit the existing template or select a new template.
- Tap “Close” and you are ready to start your class or meeting!
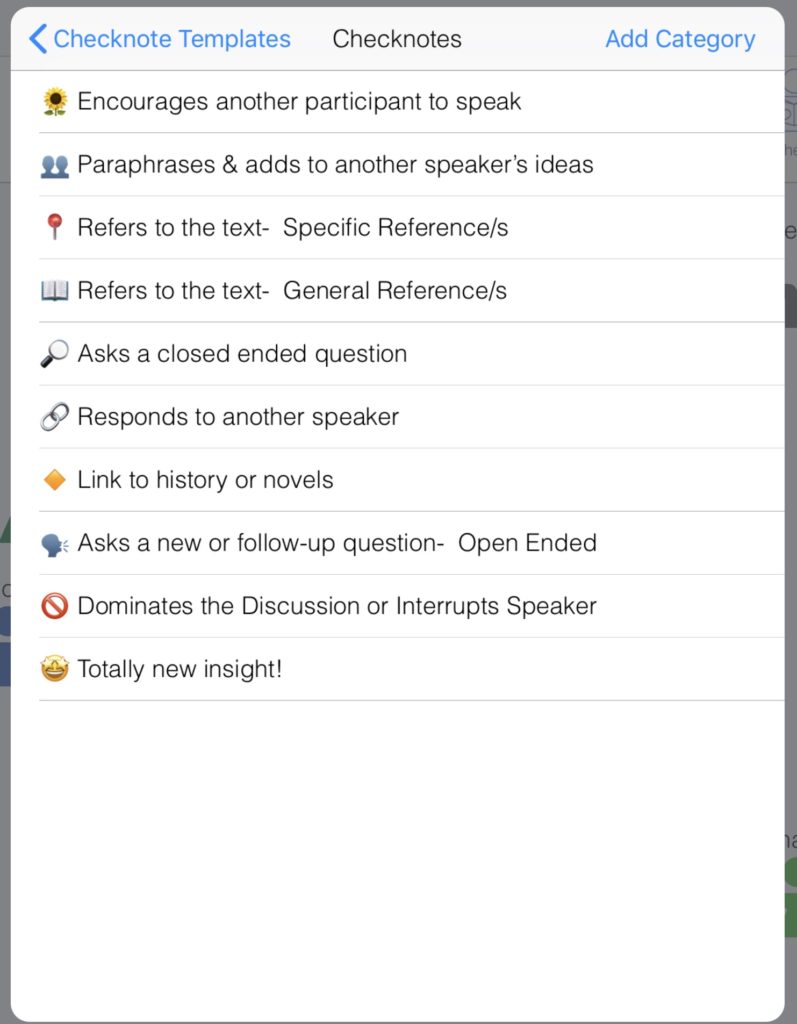
Sample CheckNote Template (Socratic Seminar):
1
1
![]()
*Available in the Premium Version
Using CheckNotes while mapping:
- While mapping a class or meeting, select the participant who is speaking.
- Participant’s icon will flash slowly.
- Tap “CheckNotes” in the top right of the screen while the participant is speaking:
- Tap on each CheckNote Characteristic that applies for the speaker.
- Tap “Submit” when completed or when someone else speaks.
Sample CheckNote Template (Socratic Seminar):
1
0
![]()
*Available in the Premium Version
Choose a CheckNote Template or Create your own:
- From the main menu tap “Create a New Map” or “Map Existing Group”.
- Select the existing group, or if this is your first group, add a group name, choose a layout, and tap “Continue”. (Hint, the yellow classroom layout will allow you to freely place participants anywhere on the screen.)
- Tap “Done” to enter the mapping screen.
- BEFORE you begin mapping, tap the blue settings icon in the upper right corner
- Tap “CheckNote Template” and the list will appear.
- Tap “View/Edit” to view the characteristics of each template or to edit your desired template.
- Once you’ve selected the template you want to use, tap “Back” and you will be prompted with the following:
- “Would you like this as your default CheckNote template? YES/NO”
- Tap “Yes” and that CheckNote template will be included with all future groups until you edit the existing template or select a new template.
- Tap “Close” and you are ready to start your class or meeting!
To learn more about how to edit or create your own template, click <HERE>
Sample CheckNote Template (Socratic Seminar):
0
0
 *Available in the Premium Version
CheckNotes bring POWER to your observations!
- CheckNotes allow you to track the types of contributions of each participant
- Choose from among 17 templates with pre-loaded characteristics to track
- Create your own custom template using the “My Template” CheckNote
- Edit or add characteristics to any of the existing templates
Choose from among the following templates:
- Classroom Observations
- Common Core (Speaking and Listening Grades 5-8)
- Common Core (Speaking and Listening Grades 9-12)
- Critical Friends Group® work by NSRF® (Text Based Protocols)
- Critical Friends Group® work by NSRF® (Tunings & Dilemma Analysis Protocols)
- General Group Discussion/Dialogue Template
- Group Discussion Style A
- Group Discussion Style B
- Literature Circles
- Professional Learning Communities (PLC)
- Professional Meeting Style 1
- Professional Meeting Style 2
- Socratic Seminar Observation Style 1
- Socratic Seminar Observation Style 2
- Socratic Seminar Observation Style 3
- Socratic Seminar Observation Style 4
- Spider Web Discussion™ (based on work by Alexis Wiggins)
Sample CheckNote Template: [Group Discussion A]
![]()
0
0
Devices / Platforms
![]() Equity Maps is currently only available for the iPad; however, it is in our plans to expand development for other platforms including Android, Mac and Chromebooks.
Equity Maps is currently only available for the iPad; however, it is in our plans to expand development for other platforms including Android, Mac and Chromebooks.
We are further updating the iOS version to meet the growing needs of our thousands of users before expanding the development.
I’m an educator myself and I am putting all sales back into the development of Equity Maps. Thanks for your patience and we’re looking for Equity Maps in other platforms for the 2021-22 school year.
9
3
NO! Equity Maps is a native, stand-alone app, so no need for additional accounts. This also helps to keep your data safe because it only exists on the user’s device.
1
0
Only one device per group!
You’ll only need Equity Maps on ONE ipad per group. One person can map the dialogue for the entire group.
0
0
For now we’ve focused on the iPad as an optimal platform for our users, especially for larger group sizes. While the app is not yet available for the iPhone or Mac, we’ll keep you posted on our plans for potential developments.
Appreciate your support!
1
0
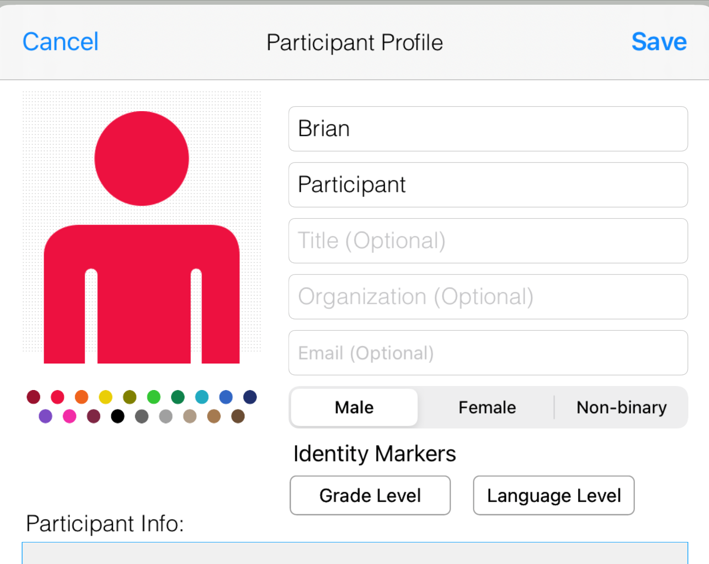
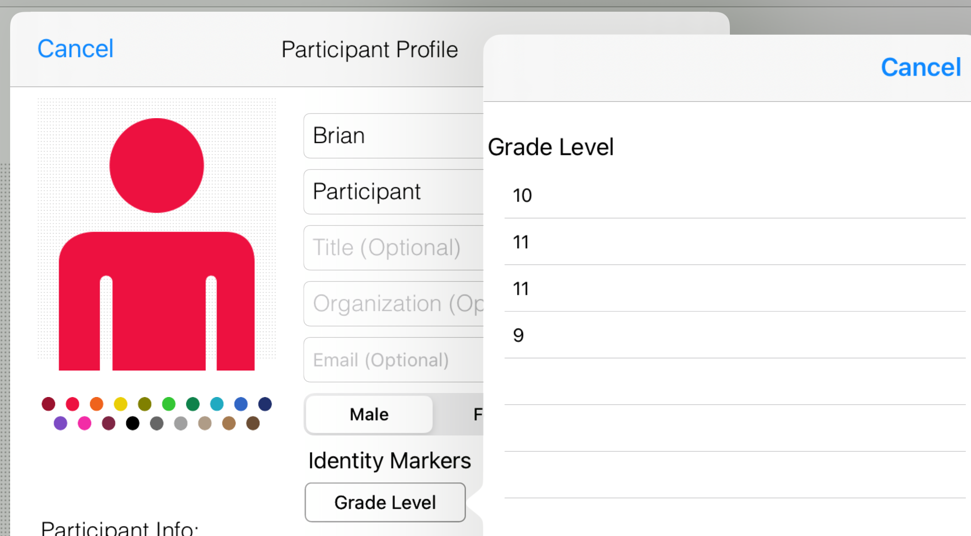
Identity Markers - Customize categories to track.
 With Identity Markers you can track participation by sub-groups within your group or class. Add up to two categories with multiple characteristics.
Popular categories: grade level, age, language level, race, learning differences, affiliations, HL/SL or any category you’d like.
Example: Grade Level
- Grade 9
- Grade 10
- Grade 11
- Grade 12
Example: Language Level
- Beginner
- Intermediate
- Advanced
- Native English
Set-up:
- Set-up the Categories and characteristics by tapping on prior to mapping.
- In the layout screen, simply long-tap on the participant and select the Identity Marker category for each participant.
Here’s something to try:
Create a category: Proximity to teacher
- Close
- Near
- Far
Create a category: Location in Room
- Left Side Front
- Left Side Back
- Right Side Front
- Right Side Back
After you add the Identity Markers according to where students are sitting, you’ll be able able to see what trends stand out. Great for instructional coaches. Does the teacher recognize students on the left? Right? Closer? Further?
1
0
With Identity Markers you can track participation by sub-groups within your group or class. Add up to two categories with multiple characteristics.
Popular categories: grade level, age, language level, race, learning differences, affiliations, HL/SL or any category you’d like.
Example: Grade Level
- Grade 9
- Grade 10
- Grade 11
- Grade 12
Example: Language Level
- Beginner
- Intermediate
- Advanced
- Native English
Directions:
- Set-up the Categories and characteristics by tapping on prior to mapping.
- In the layout screen, simply long-tap on the participant and select the Identity Marker category for each participant.
2
0
Online Learning - Integration with Zoom, Google Meet, etc.
Although it’s not possible to share your iPad while you are hosting, you can access the Meet link or the BBB link from your iPad and share your screen as another user.
Share your iPad in Google Meet in the same link you are hosting from another computer:
Share Screen
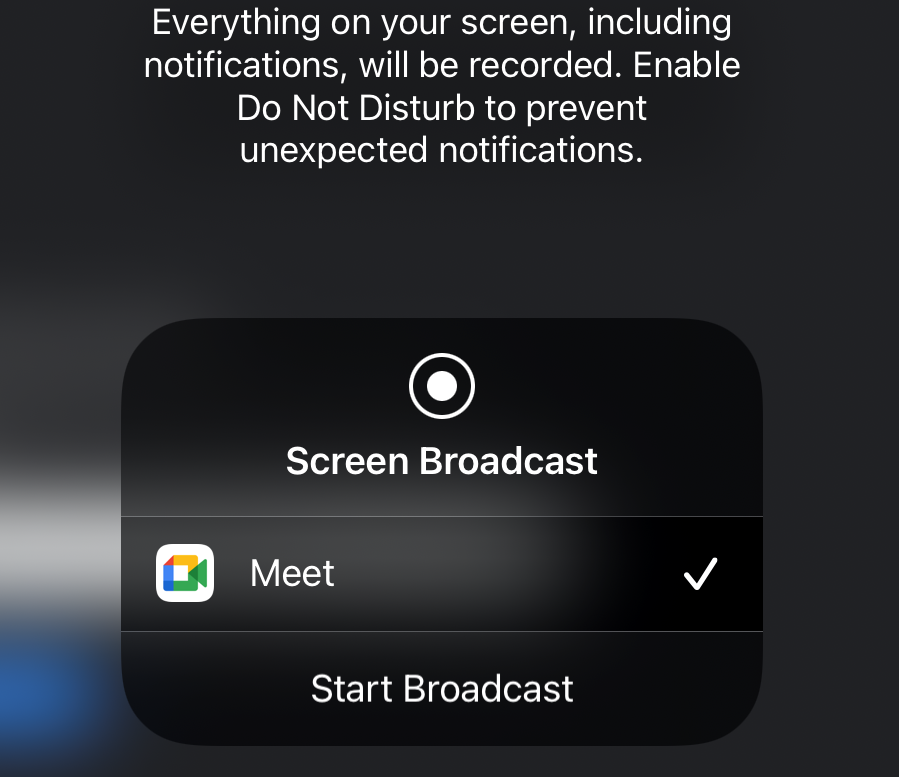
Screen Broadcast
Select “Meet”, Start Broadcast, & open Equity Maps to share the screen.
Watch this tutorial to help you get started:
Helpful hints when holding an online discussion:
- Number your students, in front of their names, and place them in order on the screen. With the positions of students constantly changing on the screen, the numbers make it much easier to map with Equity Maps.
- If you can’t rename your students, like is the case in Google Meet, place them in alphabetical order around the circle in Equity Maps. Once again, it’s easier to locate speaker.
- Group norms are a must, and the smaller the group the fewer the norms needed:
- 6 or fewer students: cameras on, share airtime, listen to understand, build on your understanding of others’ ideas, & be present.
- 7 or more students: Add a facilitator to call on the next speaker based on raised hands, virtual hand, or name in the chat.
- Consider mixing processes for who speaks.
- Rounds work great. Pick one of the #s and go in order, with 30-60 secs each. You can also allow students to pass.
- Pop-corn. Allow students to speak in any order, but once they’ve spoken once, they have to wait until everyone has spoken.
- Open-floor. Facilitator calls on next student to speak.
0
0
Zoom now makes it super easy to share your iPad screen directly in your Zoom meeting.
Watch this tutorial to help you get started:
Helpful hints when holding an online discussion:
- Number your students, in front of their names, and place them in order on the screen. With the positions of students constantly changing on the screen, the numbers make it much easier to map with Equity Maps.
- If you can’t rename your students, like is the case in Google Meet, place them in alphabetical order around the circle in Equity Maps. Once again, it’s easier to locate speaker.
- Group norms are a must, and the smaller the group the fewer the norms needed:
- 6 or fewer students: cameras on, share airtime, listen to understand, build on your understanding of others’ ideas, & be present.
- 7 or more students: Add a facilitator to call on the next speaker based on raised hands, virtual hand, or name in the chat.
- Consider mixing processes for who speaks.
- Rounds work great. Pick one of the #s and go in order, with 30-60 secs each. You can also allow students to pass.
- Pop-corn. Allow students to speak in any order, but once they’ve spoken once, they have to wait until everyone has spoken.
- Open-floor. Facilitator calls on next student to speak.
0
0
$$ Pricing $$
The latest version of the Standard version of Equity Maps (2.3.1) is only $1.99 and allows you to map up to 20 participants at one time. You can also upgrade to Premium with an in-app purchase at any time for $8.99.
The Premium Version of the app can be bought as an in-app purchase at $9.99 (USA app store). The premium allows you to map up to 40 participants at one time as well as use the Checknotes feature for tracking characteristics of what group members share. You also have access to 17 templates and can export the data to a CSV file. Many other features to come….
You can also download the stand-alone premium version and have access to future updates for the same price of $9.99 in the USA store.
See comparison chart of the features.
There are no other subscription or recurring fees associated with Equity Maps at this time.
We’ve chosen this pricing model now simply to fund the app’s development, as all sales go back into that work.
Thanks for your support of Equity Maps!
5
0
YES! Schools can now download Equity Maps Premium using Apple’s Volume Purchase Program (VPP). When schools are registered in the program they receive significant reductions in the cost of the app when downloading 20 or more licenses.
Important! If your school has access to VPP, make sure to request the Equity Maps Premium and you’ll have access to the latest and more advanced features. With the Standard app, your school will not be able to make in-app purchases using with the VPP.
1
0
Troubleshooting
If you previously upgraded to Premium and need to “restore purchase” on your iPad or a new iPad, here’s what you need to do:
- Make sure you’re logged into the same iTunes account with which you made the original purchase.
- Download the Standard Version from the app store.
- Select “Restore Purchase” in Equity Maps.
- You will be prompted to “pay” for the upgrade, press “agree”… it will seem like you are being charged (this prompt is coming from the app store).
- You will then be prompted with, “You have already purchased this, would you like to download it for free?”
- Select yes.
- You’re all set!
0
0
At this time Equity Maps does not support Dark Mode, which has been added as an option to the iPad. Make sure your iPad is in “Light” mode.
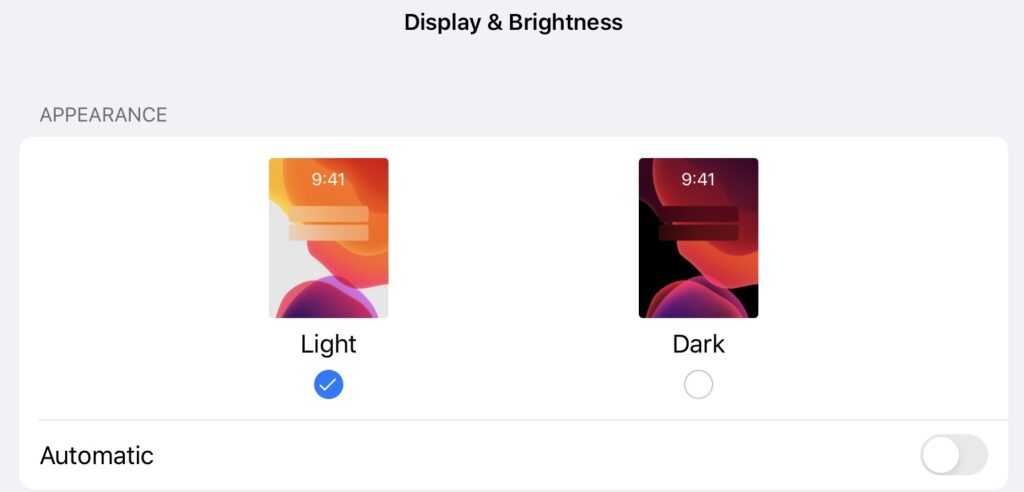
Go to your iPad Settings, Select “Display & Brightness”, within “Appearance” select “Light” mode.
0
0
At this time Equity Maps does not support Dark Mode, which has been added as an option to the iPad. Make sure your iPad is in “Light” mode.
Go to your iPad Settings, Select “Display & Brightness”, within “Appearance” select “Light” mode.
0
0
—